These soft, fluffy Cinnamon Buns are made especially for UK home bakers, using grams and millilitres, familiar supermarket ingredients and one standard 7g sachet of easy-bake yeast. Filled with plenty of cinnamon sugar and finished with a simple icing while still warm, they’re my straightforward homemade alternative to the American cinnamon roll recipes which I could only ever find written in cups.

Cinnamon Buns Recipe Snapshot
- Also Known As: Cinnamon Rolls.
- Style: Sweet enriched yeast buns.
- Texture: Soft and fluffy with a bit of slight chew.
- Flavour: Sweet with plenty of cinnamon.
- Difficulty: Medium – simple steps, but allow time for proving.
- Makes: 12 buns.
- Yeast: One 7g sachet of easy-bake/fast-action yeast.
- Method: Hand-kneaded – no stand mixer required.
- First Prove: Until doubled in size.
- Second Prove: Until light, puffy and beginning to reach towards one another.
- Bake: 20-25 minutes.
- Finish: Simple icing, added while the buns are still warm.
- Best Eaten: Fresh, but within 2 days.
Summarise & Save this Recipe on:
What Are Cinnamon Buns (Cinnamon Rolls)?
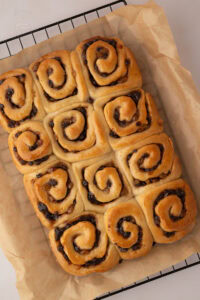
Cinnamon Buns, also commonly called Cinnamon Rolls, are sweet yeast buns made by rolling out a soft enriched dough, spreading it with a cinnamon-sugar filling, then rolling it up, slicing it into individual buns and leaving them to rise before baking.
The finished buns should be soft and fluffy with a slight chew, with lovely, obvious swirls of cinnamon running through each one. Once baked, they’re usually finished with icing while still warm so some of it melts into the buns.
And if you love buns like these, my Chelsea Buns and Belgian Buns will be right up your street too!
N.B. For this recipe, I use the terms Cinnamon Buns and Cinnamon Rolls interchangeably. The name varies depending on where you are, but the bake itself is essentially the same.
What Makes This a UK Cinnamon Buns Recipe?
Cinnamon Buns aren’t of British origin, but this recipe was developed specifically for UK home bakers. When I first made it back in 2016, most of the Cinnamon Roll recipes I could find were American recipes written in cups, so I adapted my favourite sweet dough into my own version using the ingredients and measurements I have and actually use at home.
Everything is given in grams and millilitres, with familiar UK ingredients such as caster sugar, strong white bread flour and one standard 7g sachet of easy-bake yeast – same as in my Iced Finger Buns and Hot Cross Buns recipe. The oven temperatures are also given in Celsius, fan and Gas Mark too, so there’s no need to translate an American recipe before you can even start baking.
I also finish mine with a simple icing rather than the cream cheese frosting often used on American-style Cinnamon Rolls. I did originally try using a cream cheese icing, but my family and I much prefer a simple, classic icing – it uses basic cupboard ingredients, doesn’t need to be refrigerated and lets all that cinnamon flavour remain the star of the show!
The History of My Cinnamon Buns Recipe
I first published this Cinnamon Buns recipe on Baking with Granny way back in 2016, after developing it from my favourite sweet dough recipe. At the time, I had struggled to find a Cinnamon Roll recipe aimed at UK bakers – most of what I found was American and measured in cups. So I made the kind of recipe I wanted to use for myself.
It has had a few wee tweaks over the years as I’ve continued making it – which, with two tween/teen sons who love a Cinnamon Roll, I do quite often! One of the biggest changes was reducing the yeast to one standard 7g sachet of Easy Bake yeast, simply because it’s easier and more practical for home bakers (like myself), as well as being just the right amount without being too much or too little for 12 decent-sized buns.
I also settled on my favourite mixture of strong white flour and plain flour. The strong flour gives the buns enough structure, while the plain flour helps keep them softer. You can make them with all of either flour if that’s what you have, but I find the combination gives the best balance of a soft, fluffy bun with a slight bit of chew – also known as the perfect bun!
And although you can absolutely use a stand mixer if you have one, this recipe is written to be kneaded by hand. You don’t need a thermometer, dough hook or any advanced baker windowpane test techniques – just a little time, and a dough that feels soft and smooth when it’s ready.

Key Ingredients
See the recipe card for a full ingredients list, required quantities and cup conversions.
Substitutions & Additions
Light Brown Sugar: You can swap the caster sugar in the cinnamon filling for light brown sugar if you prefer a slightly deeper, more caramel-like flavour. I’d keep the caster sugar in the dough itself, as that’s the balance I use for the bun dough.
Nutella: If you’re not a big cinnamon fan, you can swap the filling for a chocolate-hazelnut version by using Nutella. Spread it over the rolled-out dough before rolling and slicing as normal.
Biscoff Spread: Biscoff spread is another filling I’ve used and works especially well with this sweet dough. Use it in place of the cinnamon-sugar filling, then roll, slice and prove as usual.
Cream Cheese Icing: A cream cheese icing is common on American-style Cinnamon Rolls, and you can absolutely use one if you prefer. I originally made these with cream cheese icing, but switched to a simple icing because that’s what my family prefers, and it also uses fewer ingredients, doesn’t need refrigeration and makes the buns easier to store.
Looking for dairy-free, gluten-free or vegan adaptations? See the Free-from & Vegan section below.
Free-from & Vegan
Amy recommends: If you regularly need to adapt baking recipes for gluten-free, dairy-free, egg-free or vegan diets, I highly recommend The Elements of Baking by Katarina Cermelj, creator of The Loopy Whisk. It’s a brilliant resource for understanding how substitutions work, rather than simply swapping ingredients and hoping for the best.
Gluten-free Options:
Gluten-free yeast doughs behave quite differently from wheat-based doughs, so I wouldn’t recommend simply swapping the flour in this recipe for a gluten-free flour. You’ll get much better results from a recipe developed specifically for gluten-free baking, such as The Loopy Whisk’s Gluten-Free Cinnamon Rolls, which is also written for UK bakers.
Nut-free Adjustments:
This recipe contains no nuts, but as always, be sure to double-check the allergen lists for your individual ingredients.
Dairy-free Swaps:
To make this a dairy-free recipe, simply use a plant-based block margarine in place of the margarine/butter and your favourite dairy-free milk alternative. The icing topping can also be made with the same dairy-free milk.
Egg-Free Adaptations:
Because this is an enriched dough containing two eggs, I wouldn’t want to recommend replacing them with an egg replacer and hoping for the same result. Instead, I’d recommend using a recipe designed to be egg-free from the start, such as What Jessica Baked Next’s Vegan Cinnamon Rolls.
Vegan Substitutions:
The dairy is easy to replace with plant-based block margarine and dairy-free milk, but the eggs are quite important to the structure and richness of this dough. For a completely vegan version, I’d again recommend using a recipe designed to be vegan from the start, like What Jessica Baked Next’s Vegan Cinnamon Rolls.
Allergy Disclaimer & Resources:
Any advice or suggestions to make recipes “free-from” or vegan are purely suggestions. Please double-check all packaged ingredients individually, taking extra caution when baking for those with allergies or intolerances.
For official guidance on food allergies, please see Food Standards Agency (food.gov.uk) | For more info on coeliac disease, please see Coeliac UK (coeliac.org.uk) | For more info on a vegan diet, please see The Vegan Society (vegansociety.com)

How to Make Cinnamon Buns
Cinnamon Buns take a little time because of the two proves, but the method itself is simple, and you don’t need a stand mixer. Follow the step-by-step below, or head to the recipe card at the bottom for the full printable recipe.
- Warm the milk and margarine/butter. Gently warm them together until the margarine/butter is starting to melt and the mixture feels lukewarm (rather than hot).
- Make the dough. Mix the flours, caster sugar and yeast together, then add the warm milk mixture and beaten eggs. Mix until you have a soft, slightly sticky dough.
- Knead. Turn onto a floured surface and knead by hand for around 10 minutes, until the dough feels smooth.
- First prove. Place in an oiled bowl, cover and leave somewhere draught-free until doubled in size. This will usually take around 1-2 hours, but the dough is a better guide than the clock.
- Roll and fill. Roll the dough into a rectangle around 45×30cm. Mix the margarine/butter, caster sugar and cinnamon into a paste, then spread it evenly over the dough, right to the edges.
- Roll and cut. Roll up tightly from one long edge to the other, then cut into 12 buns. I halve the log, cut each half into quarters, then divide each quarter into thirds. A piece of sewing thread gives the neatest cuts, but a sharp knife is fine too.
- Second prove. Arrange the buns in a greased baking tin, leaving room between them. Cover and leave until they look light and puffy and are beginning to reach towards one another.
- Bake. Bake at 180°C (160°C fan, Gas Mark 4 or 350°F) for 20-25 minutes, until golden brown.
- Ice while warm. Mix the icing sugar, vanilla and milk until smooth, then pour or spread it over the still-warm buns so some of the icing melts into the swirls.
Tips for these UK Recipe Cinnamon Rolls
- Go by the Dough – Not the Clock: Proving times should always be a guide. Your kitchen temperature and humidity can make a big difference, so wait until the dough has doubled in size on the first prove and it looks light and puffy on the second.
- Keep the Milk Warm (not hot): The milk and margarine/butter mixture should feel comfortably lukewarm when tested with a clean finger. If it’s too hot, it can kill the yeast.
- Expect a Slightly Sticky Dough: Before kneading, the dough should feel soft and slightly sticky. After around 10 minutes of kneading, it should become much smoother and have stopped sticking to your hands.
- Use Both Flours (if you can): The mix of strong white flour and plain flour gives my favourite balance of structure and softness. All plain or all strong flour will still work, but the kneading time and finished texture will vary slightly.
- Don’t Overcrowd the Tin: I use a 35×24cm metal tin which gives the buns enough room to rise and bake evenly. But you don’t need to go out and buy a tin that exact size – just use what you have around that size. Just be cautious with using a much smaller tin, as it can leave the buns cramped and possibly affect how well they rise.
- Use Thread for Neat Slices: Ordinary sewing thread gives beautifully clean cuts without squashing the rolled dough. Although a sharp knife does work too, so don’t worry if you don’t have thread to hand.
- Aim for 12 Buns: I halve the rolled log, cut each half into quarters, then divide each quarter into thirds. That gives 12 evenly-sized buns.
- Ice While Still Warm: Adding the icing on top of the buns while they are still warm helps it spread easily and also lets a little of it melt into the swirls. Yum!
Storage, Freezing & Make Ahead
Storage: Like most sweet buns, Cinnamon Buns are best on the day they’re baked. But they will keep for around 2 days in an airtight container. Homemade yeast doughs do naturally lose some of their softness over time.
Make Ahead: You can make the dough the night before and let it do its first prove in the fridge overnight. In the morning, take it out and let it warm up a little before rolling, filling, shaping and continuing with the recipe as normal.
Freezing: For the best result, freeze the buns before baking, once they’ve been shaped. Defrost them fully, then allow them to become light and puffy before baking as normal. You can also freeze baked Cinnamon Buns, but I’d recommend you do this before icing, if possible.
Reheating: Day-old buns can be gently reheated to bring some softness back. Just bear in mind that the icing will also melt and become a little stickier – which isn’t necessarily a bad thing!

Cinnamon Buns FAQs
The most common causes are using expired yeast, liquid that was too hot, or simply not enough proving time. The first prove is ready once the dough has roughly doubled in size (rather than after a fixed number of minutes – time is just a guide). A cold kitchen can also make this take considerably longer. When warming the milk and margarine/butter, it should feel comfortably lukewarm rather than hot.
Yes, absolutely. I just prefer a mixture of plain flour and strong white flour because it gives the best balance of softness and structure, but either can be used on its own. An all-plain-flour dough may need a little more kneading, while an all-strong-flour dough will usually come together more quickly but produce a slightly less soft bun.
No. As with all my recipes, they are meant to be made by hand, and the recipe is written to reflect that. A stand mixer can certainly be used if you have one, but it isn’t at all necessary.
Dry Cinnamon Buns are usually caused by too much flour or overbaking. The dough should remain soft and smooth rather than becoming firm or dry, so avoid adding lots of extra flour while kneading. Bake only until the buns are golden brown – usually around 20-25 minutes – and then keep them airtight once cool.
More Classic Bun Recipes
If you loved this UK recipe for Cinnamon Buns, here are some more of my favourite Bun recipes for you to try next:


Save this recipe!
Want to save this recipe for later? Pop your email below and come back to it when you’re ready to bake.

Cinnamon Buns (UK Recipe)
INGREDIENTS
For the Dough
- 200 ml Milk
- 115 g Block Margarine or Butter
- 300 g Strong White Flour
- 250 g Plain Flour
- 140 g Caster Sugar
- 7 g Easy Bake Instant Yeast (usually 1 sachet)
- 2 Free-range Eggs (beaten; at room temperature; see Egg Size note below)
- Oil (for greasing)
For the Filling
- 100 g Block Margarine or Butter (at room temperature)
- 100 g Caster Sugar
- 1-2 tbsp Ground Cinnamon
For the Icing
- 200 g Icing Sugar
- 1 tsp Vanilla Extract
- 2-3 tbsp Milk
EQUIPMENT
- 35×24cm (14×9½ inch) Baking Tin (or a tin of a similar size)
INSTRUCTIONS
For the Dough
- In a small saucepan, gently warm the milk and butter/margarine until it's lukewarm (not hot!) and the butter/margarine has melted.200 ml Milk; 115 g Block Margarine or Butter
- Meanwhile, sift the flours into a large bowl. Gently mix the sugar and yeast through the flour until combined. Add the milk mixture and stir it in a little before adding the eggs. Mix together until you have a soft, slightly sticky dough.300 g Strong White Flour; 250 g Plain Flour; 140 g Caster Sugar; 7 g Easy Bake Instant Yeast; 2 Free-range Eggs
- Transfer the dough to a well-floured work surface and, using well-floured hands, knead the dough for around 10 minutes until it is smooth and no longer sticking to your hands or work surface.
- Place the dough into a lightly oiled bowl (to prevent it from sticking) and cover with an oiled piece of
cling film or a damp tea towel. Leave to rise in a draught-free place for around 1 hour, or until it has doubled in size.Oil - Once your dough has doubled in size, turn it out onto a lightly floured work surface and, using a rolling pin, roll it into a rectangle about 45×30cm (18×12 inches).
For the Filling
- Lightly grease a large baking tin (I use this 35×24cm one) and set aside.
- In a small bowl, mix the butter/margarine, sugar and cinnamon together. Spread the mixture evenly over the rolled dough, bringing it right to the edges.100 g Block Margarine or Butter; 100 g Caster Sugar; 1-2 tbsp Ground Cinnamon
- Roll the dough tightly and evenly, from the long side to the long side, to create a 45cm (18 inch) sausage. Cut the sausage into 12 individual rolls – I cut the dough in half, quarters and then thirds to make sure I get even rolls. Arrange the rolls in the prepared baking tin with plenty of space between each roll and the edges (they need space to grow!). Cover loosely with a piece of lightly greased
cling film or a damp tea towel. - Let the buns rise in a warm place for around 1 hour, or until they look light and puffy. When you see they are about ready, preheat your oven to 180°C (160°C for fan-assisted ovens, Gas Mark 4 or 350°F).
- After your buns have gone through their second rise, remove the
cling film /damp tea towel and place them in the preheated oven, baking for around 20-25 minutes, until golden brown. - Once baked, remove the buns from the oven, leaving them in the baking tin to cool a little while you prepare the icing.
For the Icing
- Mix together the
icing sugar , vanilla extract and milk to create the icing. You can add more or less milk depending on your preference for how thick you want the icing to be.200 g Icing Sugar; 1 tsp Vanilla Extract; 2-3 tbsp Milk - Spread/pour the icing evenly across the buns. Leave your cinnamon buns to cool a little until they are just warm, then enjoy.
IMPORTANT NOTE:
All my recipes are developed using a digital scale and the metric system (grams and millilitres). Cup measurements are available as a conversion, but these, unfortunately, won’t always be as accurate. For best results, I always recommend baking with a digital scale.
RECIPE NOTES:
LIKE THIS RECIPE?
Leave a comment and rating below!Originally published in August 2016.