
Belgian Buns
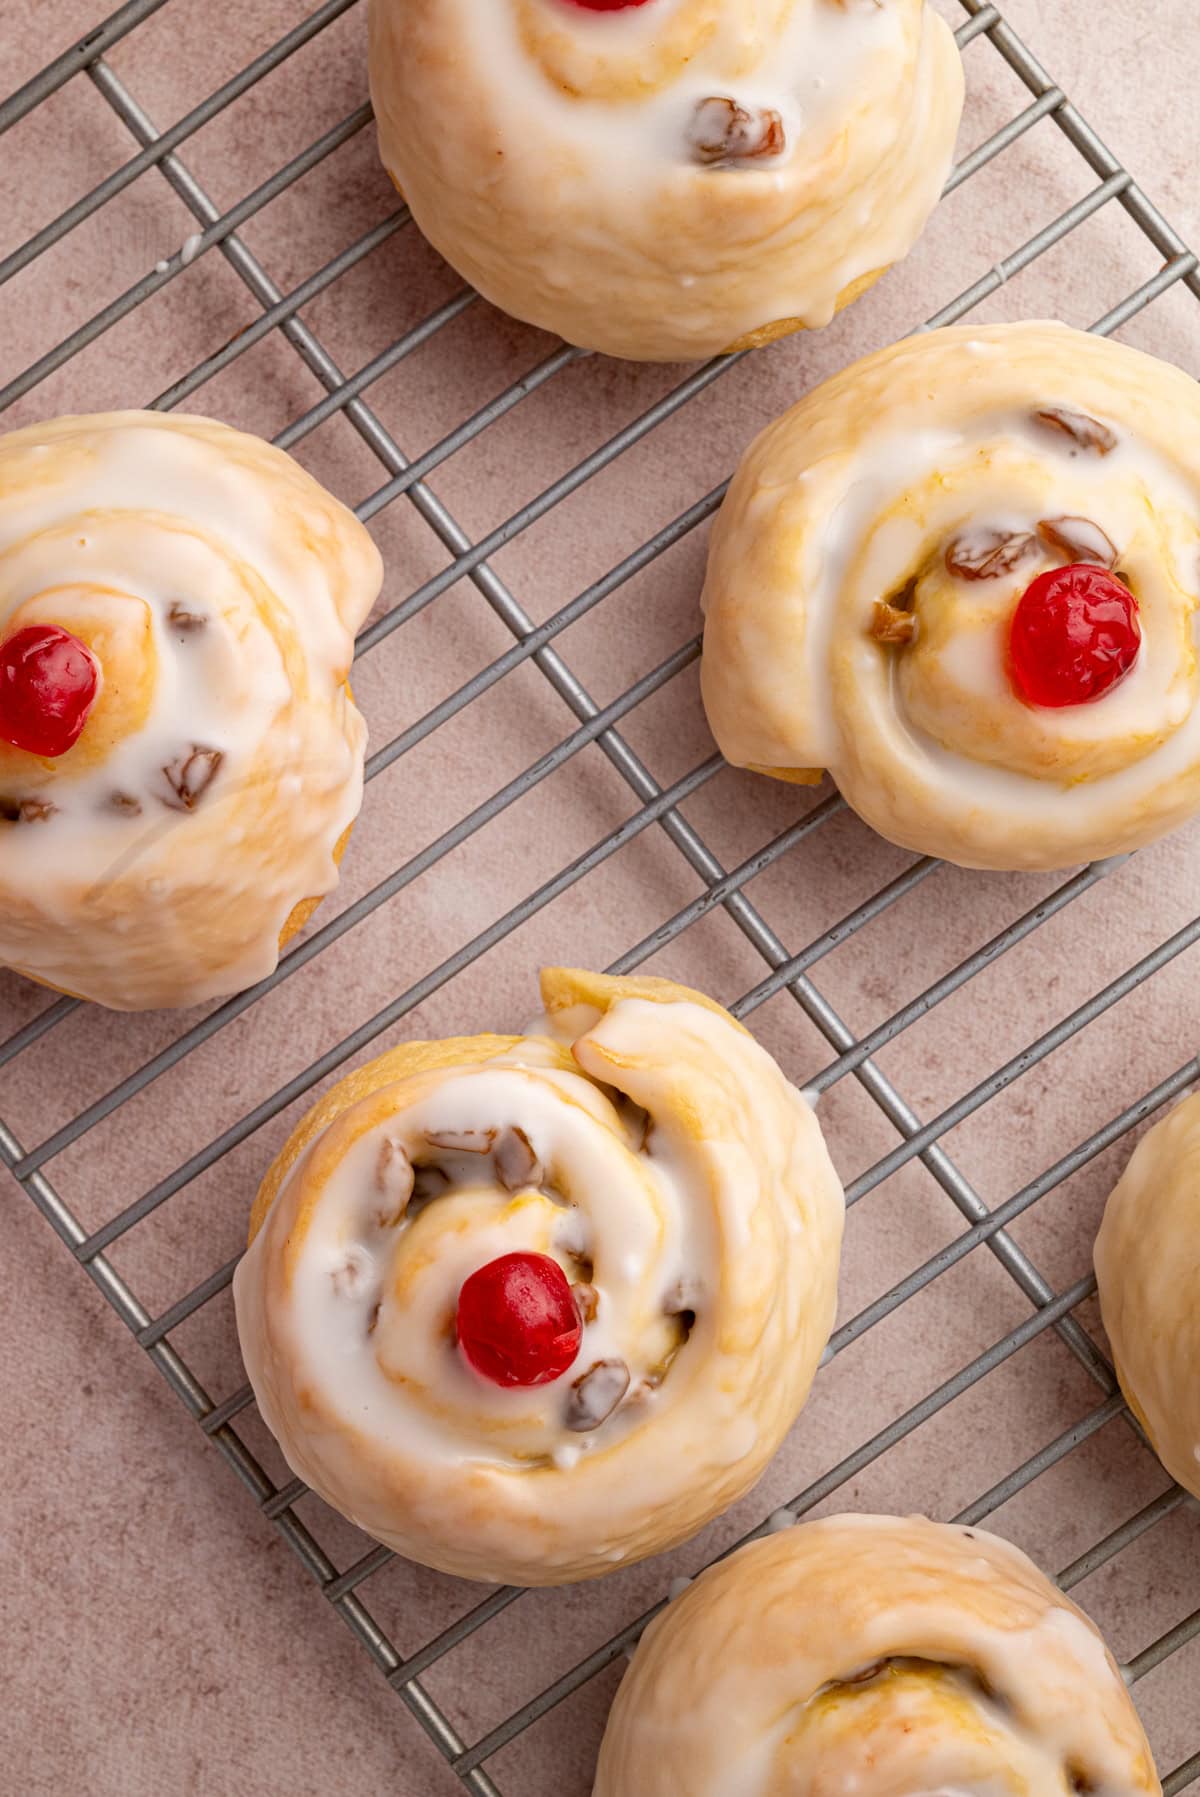
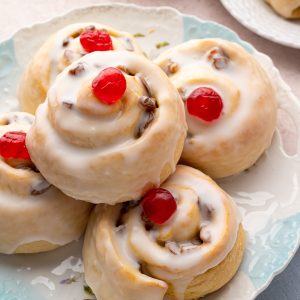
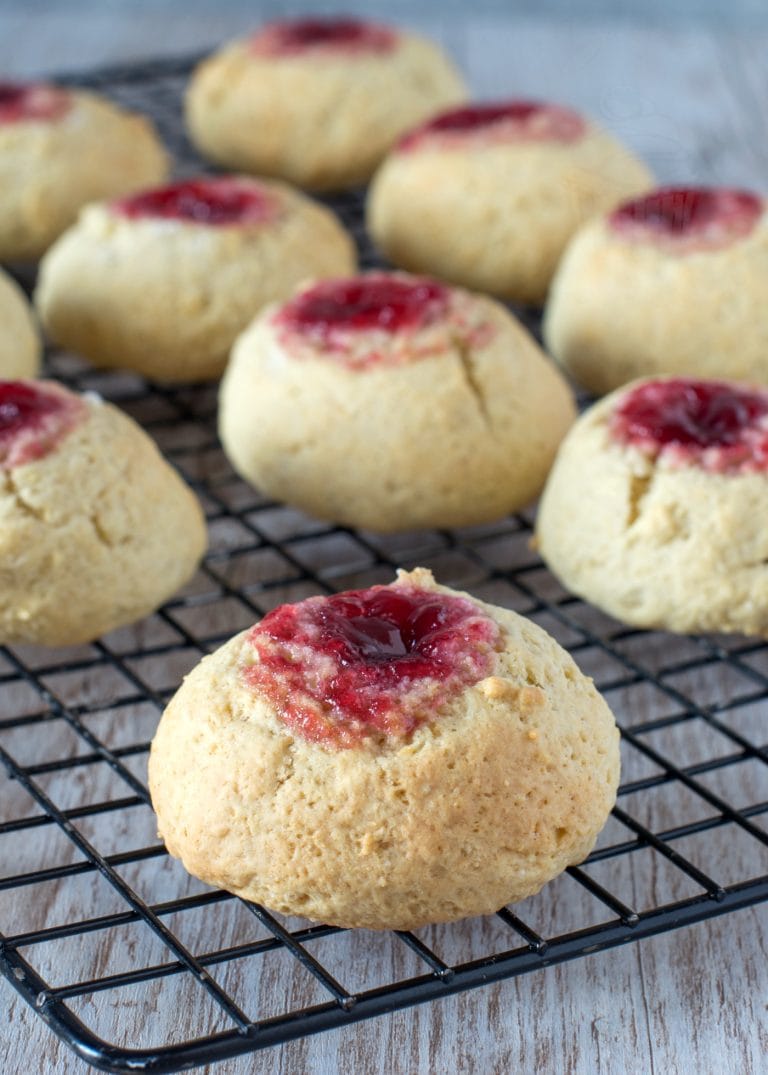
Fluffy, golden Belgian Buns swirled with tangy lemon curd and juicy sultanas, then finished with a sticky icing and glacé cherry. These homemade buns bring a bakery-quality favourite to your kitchen. Perfect for teatime or weekend baking.

If there’s one bake that reminds me of my Dad (our Papa), it’s Belgian Buns. Whether it’s following a lunch at Greggs or buying them by the tray-full at Costco, he just can’t resist them. And who can blame him?!
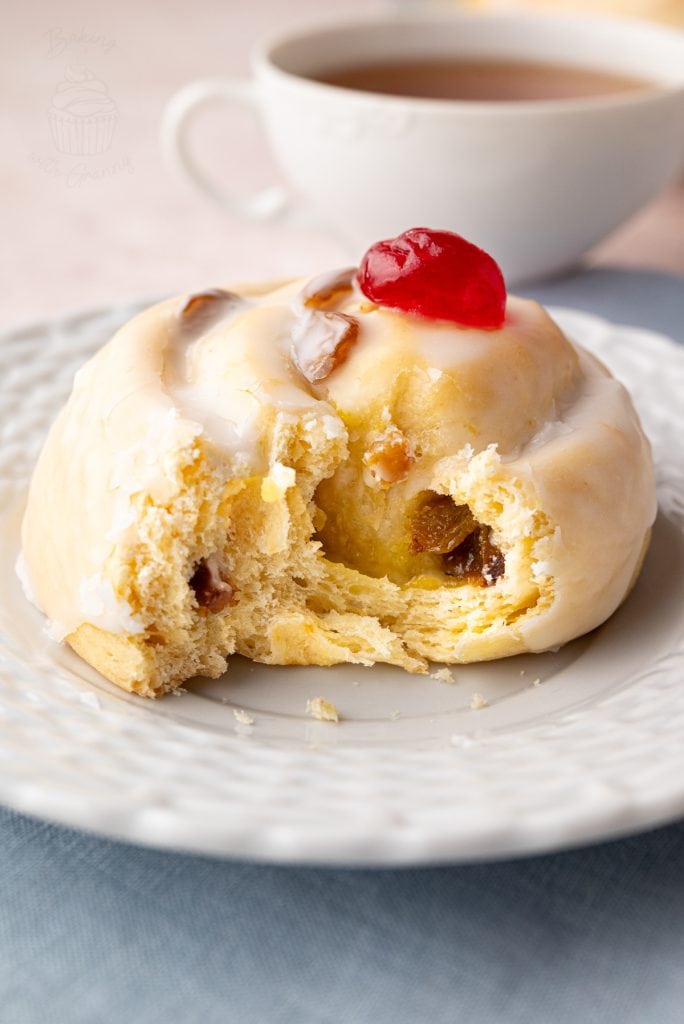
Lovely, sweet, doughy swirls, filled with plump sultanas and lemon curd, topped with a generous share of icing and lovingly crowned with a glacé cherry! What better accompaniment is there to a cup of tea?
It’s taken me a good few attempts to make this as soft and doughy as they deserve to be, and the filling is always best when you go the extra mile with a homemade lemon curd. Don’t worry, though, they still taste fantastic even with a store-bought curd.
When you do make these Belgian Buns, don’t expect them to stick around for long. If you only manage to eat one, you’re a stronger person than I am. What can I say? I’m my father’s daughter!
Top Tips for Homemade Belgian Buns:
• Don’t Rush the Rise: Give your Belgian Bun dough time to prove properly, both the first and second rise. It helps develop the best flavour and gives your buns a lighter texture.
• Keep Your Lemon Curd in Check: It’s good to be generous, but don’t go overboard. Too much curd will spill out when rolling or baking. A thin, even layer works best here.
• Roll Tightly, But Not Too Tight: You want a neat swirl without squishing out the filling or tearing the dough. Aim for snug but remain gentle.
• Space Out Your Buns: Leave a little room between each bun on the tray, as they’ll expand during the second rise, and further again while baking.
• Cool Before Icing: Make sure your buns are completely cool before adding the icing, or it’ll melt and slide right off, making them stickier than normal Belgian Buns.
• Best Enjoyed Fresh: As with most homemade buns, these Belgium Buns are at their best the same day they’re made, but they can be kept for a day or two in an airtight container.

Save this recipe!
Want to save this recipe for later?
Pop your email below and come back to it when you’re ready to bake.
More Buns You’ll Love:
• Traditional Hot Cross Buns
• Delicious Paris Buns
• Simple Iced Finger Buns
• Classic Rock Buns
Belgian Buns
EQUIPMENT
INGREDIENTS
- 120 ml Milk
- 275 g Plain Flour (All-purpose Flour) (plus extra for dusting)
- 7 g Easy Bake Yeast (usually one sachet)
- 40 g Caster Sugar (Superfine Sugar)
- 60 g Butter or Block Margarine (at room temperature)
- 1 Free-range Egg
- 3 tbsp Lemon Curd
- 150 g Sultanas
- 200 g Icing Sugar (Powdered Sugar)
- 3 tbsp Warm Water
- 6 Glacé Cherries (Candided Cherries)
INSTRUCTIONS
- In a small pan warm the milk until it's lukewarm. Set aside.
- Sift the flour into a large bowl and add the yeast. Make a well in the middle and add the butter, sugar, milk and egg. Mix to combine.
- Transfer the dough to well-floured surface, and using well-floured hands, knead the dough for around 10 minutes.
- Form the dough into a ball and transfer into a lightly greased bowl and cover loosely with a piece of lightly oiled cling film. Leave to rise in a draught-free place until it has doubled in size (around 1 to 2 hours).
- Generously grease a baking sheet with some excess butter/margarine. Set aside.
- After your dough has doubled in size, turn it out onto a lightly floured surface and knock it back. Using a rolling pin, roll it into a rectangle about 25 x 35cm (10 x 14 inches). It's important to make sure your dough is of even thickness throughout to ensure you have nice, neat buns.
- Spread the lemon curd from edge-to-edge of the dough and sprinkle the sultanas evenly over.
- Roll the dough tightly to create a sausage. Cut the sausage into 6 buns – I tend to cut in half, then thirds to ensure even buns. Arrange the rolls in your pre-greased tray and cover them loosely with a piece of lightly greased cling film.
- Leave to rise in a draught-free place for 1-2 hours until they look light and puffy.
- After your buns have gone through their second rise, remove the cling film and place the tray in a preheated oven at 180°c (160°c for fan-assisted ovens, Gas Mark 4 or 350°F) and bake for around 10-15 minutes until golden brown. Transfer to a wire rack when cool enough to touch and leave to cool completely.
For the Icing
- In a medium bowl, mix the icing sugar with the warm water, adding a tablespoon of water at a time. When of a "gloopy" consistency, dip the top of each bun into the icing to get an even topping, spreading off the excess with a clean finger.
- Finish with a glacé cherry on top of each bun.
IMPORTANT NOTE:
All my recipes are developed using a digital scale and the metric system (grams and millilitres). Cup measurements are available as a conversion but these, unfortunately, won’t always be as accurate. For best results, I always recommend baking with a digital scale.
RECIPE NOTES:
- Storage: Belgian Buns are best enjoyed on the day they are baked, but will keep for a couple of days when stored in an airtight container.
- Freezing: You can freeze Belgian Buns. For the best results, follow steps 1-10 and allow the buns to cool completely before freezing. Frozen Belgian Buns will keep fine in your freezer for 2-3 months. Defrost at room temperature and ice them as normal.
- Sultanas: If you’re not a fan of sultanas, you can leave these out or replace them with another dried fruit of your choice, like raisins or dried cranberries.
- Lemon Icing: If you’d prefer a zestier icing, you can use lemon juice instead of water when making the icing.
Belgian Buns are sweet, yeasted buns filled with juicy sultanas and lemon curd, rolled like a Cinnamon Bun and baked until soft and golden. They’re finished with a sticky layer of icing and topped with a glacé cherry. Belgian Buns are a popular treat in British bakeries, loved for their soft texture, fruity filling, and sweet, sticky finish.
To make Belgian buns, you start by preparing a soft, yeast dough and let it rise until doubled in size. You’ll then roll it out, spread with lemon curd, and sprinkle with sultanas before rolling it up and slicing into buns. After a second rise, you the buns bake until golden, then finish with icing and a glacé cherry on top.
Despite the name, Belgian Buns are actually a classic British bake with no real link to Belgium. No one’s entirely sure where the name came from, but it’s likely it was chosen to sound a bit more fancy or exotic. It might also be a nod to the sweet icing and dried fruit – both common in Belgian-style baking.
Free-from & Vegan:
Gluten-free: To make these gluten-free Belgian Buns, you can try swapping the flour for a gluten-free blend and adding ½ teaspoon of xanthan gum if your blend doesn’t already include it. Be aware that the dough may be softer and more delicate -chilling it before rolling can help. Alternatively, Becky Excell has a tried-and-tested gluten-free Belgian Buns recipe that you could use instead.
Dairy-free: To make this a dairy-free Belgian Buns recipe, you can swap the milk for your favourite milk-alternative (soya, almond, oat…), use a dairy-free margarine in place of butter, and check your lemon curd is dairy-free also.
Egg-free: To make this a egg-free Belgian Buns recipe, you can try using an egg replacer, such as 3 tbsp of aquafaba (chickpea water) or flaxseed or chia seed “eggs”. You will also want to use an egg-free lemon curd.
Nut-free: This Belgian Buns recipe doesn’t contain any nuts, but be sure to double-check all your individual ingredients for any hidden nuts when making for those with allergies.
Vegan: To make this a vegan Belgian Buns recipe, simply follow the dairy-free and egg-free steps above.
N.B. Any advice or suggestions to make recipes “free-from” or vegan are purely that – suggestions. Please be careful to double-check all ingredients individually, taking extra caution when serving to those with allergies & intolerances.
For more info on common food allergies, please see food.gov.uk | For more info on coeliac disease, please see coeliac.org.uk | For more info on a vegan diet, please see vegansociety.com

Originally published in July 2017. Updated in June 2025.
Thank you to Naomi Seiler for creating the updated photos.


Amazing, came out perfect! I must admit I made 12 small ones instead of 6 large ones, and it worked fine. Delicious!
It doesn’t say in the recipe when to add the warm water? Can you let me know what step this is? Thanks for the recipe!
Warm water is for icing
Brilliant recipe works perfectly every time
Fantastic recipe – works every time
Definitely better with lemon juice icing
Fantastic recipe – works every time
Definitely better with lemon juice icing