This easy Plum Cake recipe combines a soft vanilla sponge with fresh plums that turn deliciously jammy as they bake, finished with a sprinkling of sugar, giving the perfect little bit of crunch on top. Simple, quick and beginner-friendly, it’s one of my favourite ways to use up a glut of ripe plums.

Plum Cake Recipe Snapshot
- Recipe: Easy Plum Cake.
- Texture: Soft sponge with jammy plums and a crisp sugar topping.
- Flavour: Sweet vanilla sponge with plenty of fresh plum flavour.
- Difficulty: Easy – great for beginner bakers.
- Prep Time: Approx. 15 minutes.
- Bake Time: 35-45 minutes.
- Tin: 18cm (7 inch) square cake tin.
- Plums: Ripe but reasonably firm – avoid very soft or overripe fruit.
- Plum Placement: 9 plum halves, cut-side up.
- Best Eaten: On the day it’s baked, while the sugar topping is still crisp.
- Best Served: Slightly warm, either on its own, or with ice cream or custard.
Summarise & Save this Recipe on:
What Is Plum Cake?
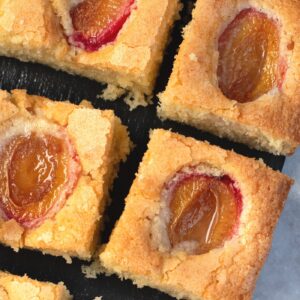
Plum Cake is a simple sponge cake baked with fresh plums, which soften and become deliciously jammy as the cake cooks. In my recipe, the plums are placed cut-side up over a sweet vanilla sponge, then sprinkled with sugar before being baked, giving the top a lovely crisp finish.
There are lots of different cakes around the world called Plum Cake, including richer fruit cakes and versions made with yoghurt, oil or spices. This one is much more simple – a straightforward British-style sponge made with familiar baking ingredients and lovely fresh plums. It’s a seasonal bake that I love to make when there’s plenty of fruit around. And like my traditional Apple Crumble and Rhubarb Crumble recipe, it’s a cake where the fruit itself is very much the star.
The plums will naturally sink slightly into the sponge as the cake rises around them, which is exactly what we want. Keeping them halved rather than cutting them into smaller pieces helps them stay visible in the finished cake, while also keeping more of their juices within the fruit.
The extra sugar sprinkled over the top might seem like a small, insignificant detail, but it makes a really big difference. Not only does it add a little extra sweetness, but it also helps the exposed plums turn jammy as they bake, and gives the top of the cake a lovely bit of crunch against the soft sponge underneath.
When You Have More Plums Than You Know What to Do With
This idea for this Plum Cake came about after my mother-in-law arrived one day with two carrier bags and a tub absolutely packed with plums from a tree that had produced far more fruit than any one person could ever really eat.
My boys did their best to work their way through them. We then passed plenty on to my Mum and Dad. And then I eventually realised that if I wanted to actually bake anything with the remaining plums, I was going to have to hide a few before they disappeared!
I tried a few different versions of the sponge, but the real game changer for me was when I sprinkled some caster sugar over the plums and cake batter before baking. It gives you exactly the contrast I wanted – a soft sponge, plums that turn lovely and jammy in the oven, and just the right amount of crispiness on top.
That’s also why I don’t get too hung up on using a particular variety of plum. This is a recipe made for using the fruit you happen to have, whether that’s a bag from the supermarket or a glut from somebody’s garden. It’s the same approach I take with recipes like my Eve’s Pudding and British Apple Pie – just use what’s in season and make something good from it. As long as the plums are ripe but still reasonably firm, they should work beautifully.

Key Ingredients
See the recipe card for a full ingredients list, required quantities and cup conversions.
Substitutions & Additions
Golden Caster Sugar: Golden caster sugar can be used in place of regular caster sugar if you prefer. It gives the cake a slightly more caramel flavour while still keeping the sponge light.
Almond Extract: Almond extract works really well with plums and can be used in place of the vanilla extract if you want a slightly different flavour.
Other Fruit: I haven’t yet tested this exact recipe with other fruits, so I wouldn’t recommend a direct swap without some experimenting first. Peaches are one I’d be particularly interested in trying, though – they should give a similar soft, juicy result when baked.
Looking for dairy-free, gluten-free or vegan adaptations? See the Free-from & Vegan section below.
Free-from & Vegan
Gluten-free Options:
This Plum Cake works well with a like-for-like gluten-free self-raising flour in place of the standard self-raising flour. As always, check the labels on your other ingredients if you’re baking for someone with an allergy or intolerance.
Nut-free Adjustments:
This recipe contains no nuts, but as always, be sure to double-check the allergen lists for your individual ingredients.
Dairy-free Swaps:
Simply use a dairy-free baking margarine in place of butter. The rest of the recipe contains no dairy.
Egg-Free Adaptations:
This one is a little trickier! With three eggs in the sponge, I’d be reluctant to recommend simply replacing them with an egg replacer without testing the result first. Instead, I would use a tried-and-tested egg-free vanilla sponge recipe as your base, then add the halved plums and sprinkle of caster sugar on top as described in this recipe. Ideally, look for an egg-free sponge designed for a similar-sized tin so the quantities and baking time aren’t too far removed from this one.
Vegan Substitutions:
I would recommend taking the same approach as the egg-free version. Start with a reliable vegan vanilla sponge recipe suitable for a similar-sized tin, then add the plums and caster sugar topping as described here.
Allergy Disclaimer & Resources:
Any advice or suggestions to make recipes “free-from” or vegan are purely suggestions. Please double-check all packaged ingredients individually, taking extra caution when baking for those with allergies or intolerances.
For official guidance on food allergies, please see Food Standards Agency (food.gov.uk) | For more info on coeliac disease, please see Coeliac UK (coeliac.org.uk) | For more info on a vegan diet, please see The Vegan Society (vegansociety.com)
How to Make Plum Cake
This is a really straightforward sponge cake, but I recommend having your plums halved and ready before you start making the batter. That way, the cake can go straight into the oven once everything is mixed.
- Prepare your tin and plums. Preheat your oven to 180°C (160°C fan-assisted ovens, Gas Mark 4 or 350°F) and line an 18cm (7 inch) square cake tin with greaseproof paper. Halve the plums, remove the stones and leave the skins on.
- Cream the margarine/butter and sugar. Beat the soft margarine/butter and caster sugar together until light and fluffy. If you’re using butter, make sure it is properly softened to room temperature first.
- Add the eggs and vanilla. Add the eggs one at a time, mixing until combined before adding the next. Mix through the vanilla extract.
- Fold in the flour. Sift in the self-raising flour and gently fold everything together until you have a smooth cake batter. It should look much like a normal sponge cake batter – don’t worry about making it especially thick to hold the plums.
- Add the plums and sugar topping.Transfer the batter to your prepared tin and smooth the surface. Arrange nine plum halves, skin-side down and cut-side up, in three rows of three, pressing them gently into the batter a little, but don’t push them right down as they will sink a little as they bake. Sprinkle the extra tablespoon of caster sugar evenly over the plums and exposed cake batter. This is what helps give the plums their lovely jammy finish while creating that little bit of crunch on top.
- Bake. Bake for 35-45 minutes, until the sponge is golden and springs back lightly when touched. A skewer inserted into the sponge – rather than through one of the plums – should come out clean. The plums will sink into the sponge as it rises around them, but they shouldn’t disappear completely. They’ll also be extremely hot and juicy straight from the oven, so be careful when checking the cake.
- Cool slightly before serving. Leave the Plum Cake to cool in the tin until it is cool enough to handle. I particularly love it while it’s still slightly warm, when the plums are soft and jammy and the sugar topping is at its crispest. Serve as it is, or add a scoop of ice cream or some custard.
Top Tips for Plum Cake
- Use ripe but reasonably firm plums: Very soft or overripe plums will release much more juice as they bake, which can make the surrounding sponge wetter. They don’t need to be a particular variety – just avoid fruit that is already very soft.
- Keep the plums halved: It can be tempting to cut larger plums into quarters, but I find halves work best. Smaller pieces are more likely to sink further into the batter and release more juice into the sponge.
- Have your plums ready before making the batter: Halve and stone them before you start mixing the cake so you can arrange them over the batter and get everything into the oven straight away.
- Don’t skip the sugar on top: That final tablespoon of caster sugar is a small addition that makes a big difference. It helps the plums become wonderfully jammy while giving the exposed sponge a lovely light crunch.
- Use the correct tin size: This recipe is designed for an 18cm (7 inch) square tin, with nine plum halves arranged in three rows of three. A significantly larger tin will give you a shallower cake and can change the baking time.
- Check the sponge, not the plum: To test if the cake is ready, insert a skewer into an area of sponge rather than through one of the plums. It should come out clean, and the cake should be golden and spring back lightly when touched. Be careful – those plums will be extremely hot!
- Enjoy it on the day you bake it: Plum Cake is at its best while the sponge is soft, the plums are freshly jammy and the sugar topping still has its crunch. It will keep for a couple of days, but the plum juices gradually seep further into the sponge and the crisp topping starts to soften within about 24 hours.
Storage & Freezing
- Storage: Plum Cake is best eaten on the day it is baked, while the sponge is soft, the plums are freshly jammy and the sugar topping still has a little crunch. Any leftovers can be stored in an airtight container in the fridge for 2-3 days.
As the cake sits, the plums will continue to release some of their juices into the sponge, making it softer and wetter around the fruit. The crisp sugar topping will also begin to soften, usually within about 24 hours. The cake will still taste lovely, but the texture is definitely at its best when fresh. - Freezing: Plum Cake can be frozen, although the texture of the fruit will change slightly after defrosting. I recommend freezing it in individual portions, wrapped well and placed in an airtight container or freezer bag. Defrost at room temperature before serving. The plums will be much softer once thawed and may release a little more juice into the surrounding sponge as they defrost, so again, the freshly baked cake gives you the best texture.
How to Serve Plum Cake
Plum Cake is lovely when served either warm or completely cooled, but my favourite way to eat it is slightly warm from the oven, once it has cooled enough to slice (watch the plums especially – they will be very hot from the oven!). At that point the plums are wonderfully soft and jammy, while the sugar topping still has its lovely little bit of crunch.
Serve a slice on its own, or turn it into more of a dessert with a scoop of vanilla ice cream or some warm custard.
Once completely cooled, it’s just as good eaten as a simple cake – perfect with a cup of tea or coffee. Although the topping will gradually soften as the plum juices settle further into the sponge.

Plum Cake FAQs
You don’t need a particular variety of plum for this recipe. I use whatever plums I happen to have available. The important thing is that they are ripe but still reasonably firm. Very soft or overripe plums will release more juice into the sponge as they bake.
No – leave the skins on. The plums are baked skin-side down, which helps them hold their shape and keeps more of their juices within the fruit. The exposed flesh softens and becomes wonderfully jammy as the cake bakes.
Some sinking is completely normal. The sponge rises around the plum halves as the cake bakes, leaving them partly nestled into the finished cake. As long as you use the correct tin size, recipe quantities and reasonably sized plum halves, they shouldn’t disappear completely into the sponge.
You can, but Plum Cake is best on the day it is baked. The sugar topping has its best crunch when fresh and the plums are beautifully soft and jammy. After about 24 hours, the fruit juices start soaking further into the sponge and the topping gradually softens.
More Fruity Baking
If you loved this Plum Cake, here are some more of my favourite baking with fruit recipes for you to try next:
Save this recipe!
Want to save this recipe for later? Pop your email below and come back to it when you’re ready to bake.
Plum Cake
INGREDIENTS
- 175 g Soft Margarine (or Butter) (at room temperature)
- 175 g Caster Sugar
- 3 Free-range Eggs (at room temperature; see Egg Size note below)
- ½ tsp Vanilla Extract
- 175 g Self-raising Flour (see Self-raising Flour note below)
- 4½ Plums (fresh)
- 1 tbsp Caster Sugar (for topping the cake)
INSTRUCTIONS
- Preheat your oven to 180°C (160°C for fan-assisted ovens, Gas Mark 4 or 350°F) and line a square 18cm (7 inch) tin with
greaseproof paper . Set aside. - Halve your plums, discarding the stone and leaving the skins on. Set aside.
- In a large bowl, cream together the butter/margarine and sugar until light and fluffy in both colour and texture. Add your eggs, one at a time, mixing until combined before adding the next. Add the vanilla and mix through.
- Sift the flour into the bowl before gently folding it through to create a smooth batter. Transfer the batter to your pre-lined tin, smoothing the top.
- Place your cut plums skin-down on top of the cake batter, pressing them down just a little. I like to do 3 rows of 3 (nine plum halves in total), but you can lay them out however you like. Sprinkle the top of the cake with an additional tablespoon of caster sugar.
- Bake in your preheated oven for 35-45 minutes, until the sponge is golden, springs back lightly when touched, and a skewer inserted into the sponge (rather than through a plum) comes out clean.
- Remove from the oven and allow to cool for at least 10 minutes before serving.
IMPORTANT NOTE:
All my recipes are developed using a digital scale and the metric system (grams and millilitres). Cup measurements are available as a conversion, but these, unfortunately, won’t always be as accurate. For best results, I always recommend baking with a digital scale.
RECIPE NOTES:
LIKE THIS RECIPE?
Leave a comment and rating below!Originally published September 2023.