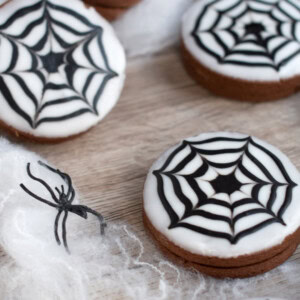
Spider Web Biscuits
If I’m honest, these Spider Web Biscuits were a bit of an afterthought for me this year. For those who know me, this statement is often unexpected to hear… I’m not big on Halloween. Don’t get me wrong, the spooky aesthetic and dark décor certainly appeal to my inner goth. In fact, I usually find…

If I’m honest, these Spider Web Biscuits were a bit of an afterthought for me this year.
For those who know me, this statement is often unexpected to hear… I’m not big on Halloween. Don’t get me wrong, the spooky aesthetic and dark décor certainly appeal to my inner goth. In fact, I usually find some sort of Halloween-intended ornament or picture, which ends up staying up in our house year-round. But truth be told, I’m more of a Christmas person (a statement which won’t be a surprise to those who know me!)
It was the kids who actually asked if I would bake them something Halloween-y. I had a couple of ideas initially, but ended up going for something I knew would be fool-proof and guaranteed to please my toughest critics! From that mindset, these easy-peasy Spider Web Biscuits were born.
The eagle-eyed amongst us may notice the similarities between this recipe and our infamous Empire Biscuits. And our Pumpkin Biscuits. That’s because they’re pretty much the same, with the exception of these being more of a chocolate Empire Biscuit. And a somewhat creepier finish!

Ingredients for Halloween Biscuits:
Butter or Block Margarine
All good biscuits are made up of a few components. First is the “fat”. In this case, it is usually butter, but you can, of course, use a good block margarine too. Butter is generally regarded as having a better flavour; however, margarine can be considerably more affordable, and a great way to cut the dairy out of the biscuit dough.
Just be sure to use a block margarine, as opposed to a spreadable margarine; the latter will make your biscuit dough too soft.
Caster Sugar
The next component in a biscuit recipe is the “sweetener”. In this recipe, we use caster sugar. The fine granules of caster sugar work best as they distribute evenly through the dough and give a nice flavour and texture. You can switch the caster sugar out for a golden caster sugar, should you prefer – this will give your biscuits a slightly more caramel flavour, as well as reducing the sweetness ever-so-slightly.
Free-range Egg
Eggs aren’t always considered an essential in a biscuit dough recipe; however, we do recommend using one here. Not only does it help bind the ingredients together, but it also gives the dough a richer flavour. Just be sure to use free-range eggs.
Plain Flour
The final essential ingredient in a biscuit dough is the “dry” ingredient. For spider web biscuits, we opt for plain flour. No raising agents are necessary, so plain flour works perfectly.
Cocoa Powder
My preference for this Halloween biscuit is to make it chocolatey! You can, however, have them as a more plain affair – simply swap out the cocoa powder for the same amount of extra flour.
Chocolate Hazelnut Spread
You can use whatever filling you wish when it comes to these little cookies. I have listed Nutella within their recipe, as it is Halloween, all of the chocolate is a must! However, you could also use Biscoff spread, peanut butter, jam… I recommend a blackberry jam for a black-forest-esque flavour.
Icing Sugar
The spider web decoration of these spooky biscuits is deceivingly simple and is achieved with just some icing sugar, water and a little black food colouring. Gel food colouring is best, but see Granny’s Top Tips for my tricks on how to get your icing extra black.
Tips for Halloween Spider Biscuits:
• When it comes to rolling the dough for cutting your biscuits, place the dough between two sheets of greaseproof paper and roll it within that. This means you can avoid using extra flour whilst rolling, which can make your biscuits appear dusty in appearance, even after baking.
• The biscuits photographed here were made using a 3-inch cookie cutter, which makes around 9 biscuits (sandwiched together, 18 individually). You can use whatever-sized cookie cutter you’d like, just be aware that smaller ones can be trickier to pipe your spider webs onto.
• For jet black icing to use in your spider webs, a gel food colouring is an absolute must. And even then, it can feel like you’re adding loads of the stuff and still ending up with only a grey icing at best. A great tip I love for creating icing as black as the Halloween night sky: Add a tablespoon of cocoa powder to your white icing, alongside your black gel food colouring (and some extra water, to balance out the extra dry ingredient). It’s much easier to make a brown icing black than it is to make a white icing black.
•When it comes to creating your spider webs, don’t worry about perfection. In fact, you won’t even be piping out spider webs! Instead, you will simply pipe out a few circles within each other. Then you will use a cocktail stick to drag the circles out from the middle, through each other, creating a unique spider web on each biscuit.

Save this recipe!
Want to save this recipe for later? Pop your email below and come back to it when you’re ready to bake.
Spider Web Biscuits
INGREDIENTS
- 250 g Block Margarine or Butter ((at room temperature))
- 130 g Caster Sugar (Superfine Sugar)
- 1 Free-range Egg ((at room temperature))
- 450 g Plain Flour (All-purpose Flour)
- 50 g Cocoa Powder
- 9 tsp Nutella ((approx.))
- 300 g Icing Sugar (Powdered Sugar)
- Black Food Colouring
INSTRUCTIONS
- Preheat your oven to 180°c (160°c for a fan-assisted oven, Gas Mark 4 or 350°F) and line a couple of baking sheets with greaseproof paper. Set aside.
- In a large bowl, cream together your butter/margarine and sugar until light & fluffy.
- Add your egg and stir through until combined.
- Sift in your flour and cocoa powder. Stir through and use your hands to bring the ingredients together and create a dough. Gently knead your dough on a work surface to ensure it is smooth.
- Place the dough between two sheets of greaseproof paper. Using a rolling pin, roll the dough to around 1cm thickness, before cutting your biscuits with a cookie cutter to your desired size. Transfer the cut biscuits to your pre-lined baking sheets.
- Bake your biscuits in your preheated oven for 10-15 minutes, until the appear dry on top. Times will depend on your biscuit size – less for smaller biscuits, longer for bigger ones.
- Once your biscuits are cool enough to handle (but still warm), spread the Nutella to the underside of half your biscuits; using about a teaspoon of Nutella for each biscuit. Pop the other half of the biscuits on top of these and sandwich together. When your biscuits are completely cool, prepare your icing.
For the Decoration
- In a small-medium sized bowl, mix your icing sugar with a few tablespoons of hot water, until you have a slightly runny but somewhat "gloopy" consistency. Remove a couple of tablespoons of your icing and mix with your black food colouring (see Granny's Top Tips for advice on getting a good colour in your black icing). Transfer the black icing to a piping bag and set aside.
- Once your now-filled biscuits have cooled completely, gently dip the top of your biscuit into your white icing, holding it over the bowl of icing for a moment to allow the excess to drip off.
- Using your black icing, pipe a few circles on top of your white icing, finishing with a decent sized dot in the centre. With a cocktail stick, drag around half-a-dozen lines from the middle dot, through the circles to the biscuit edge. This will make your spider web design. Allow the icing to set for a couple of hours before enjoying.
IMPORTANT NOTE:
All my recipes are developed using a digital scale and the metric system (grams and millilitres). Cup measurements are available as a conversion but these, unfortunately, won’t always be as accurate. For best results, I always recommend baking with a digital scale.
Tried this recipe?
Tag @bakingwithgranny or use the hashtag #bakingwithgranny!Free-from & Vegan:
Nut-free: Use jam instead of Nutella in the biscuit filling, or a chocolate spread that is nut-free. Be sure to also check your other ingredients for any hidden nuts.
Dairy-free: Use a dairy-free block margarine as opposed to butter. Swap the Nutella filling for Biscoff spread, peanut butter, jam or a dairy-free chocolate spread.
N.B. Any advice or suggestions to make recipes “free-from” or vegan are purely that – suggestions. Please be careful to double-check all ingredients individually, taking extra caution when serving to those with allergies & intolerances.
For more info on common food allergies, please see food.gov.uk | For more info on coeliac disease, please see coeliac.org.uk | For more info on a vegan diet, please see vegansociety.com


Very well explained how to make them
Loved the options for gluten free never seen that before .
Off to make them for my grandchildren gluten free!!
A very happy Granny thank you .
Super delicious!