
Clootie Dumpling
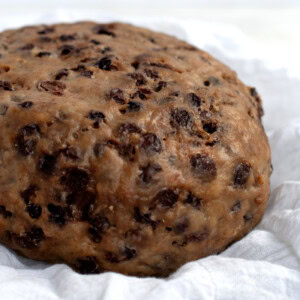
This traditional Scottish Clootie Dumpling is packed with dried fruit, warming spices and treacle, creating the classic dense, comforting pudding loved across Scotland. With detailed step-by-step instructions and plenty of tips, this easy recipe will guide you through making an authentic Clootie Dumpling at home.

Let me start this Clootie Dumpling recipe by saying there is a lot of information here. A LOT.
That is an intentional decision.
Despite being Scottish, Clootie Dumpling wasn’t something I even tasted until well into adulthood, and it certainly wasn’t something I had ever attempted to make myself.
For anyone unfamiliar, Clootie Dumpling is a traditional Scottish boiled-fruit pudding, packed with dried fruit and warming spices, somewhat like Christmas Pudding, but cooked in a cloth (or “cloot”). It’s one of those wonderful Scottish recipes that has been passed down through generations of families. And of course, earned a place in my debut cookbook, Scottish Bakes.
And boy, was this a learning curve!
In theory, Clootie Dumpling is a fairly easy recipe. But as I soon discovered, there are a few things that can easily go wrong or cause the panic of, “Is that meant to happen?”, especially when you’ve never made one before.
So for you, I’ve tried to include everything you might need to know: the history of Clootie Dumpling, in-depth instructions to keep you right, ingredient explanations and substitutions, and lots of tips for success. In short, this is a complete, easy-to-follow guide to making an authentic Clootie Dumpling at home.
Like I say, Clootie Dumpling wasn’t something I had tried until I was an adult. In fact, the first time I tasted it was at Foodies Festival Christmas in Edinburgh in 2018, when the lovely Michelle of Clootie McToot joined us to demonstrate how to make your own Clootie Dumpling.
Unfortunately, I missed most of her demonstration as I was backstage preparing for my own demo straight afterwards. I did, however, manage to steal a bowl of her delicious Clootie Dumpling – and it was love at first spoonful! Since then, I have always hoped to share a Clootie Dumpling recipe here on Baking with Granny. But unlike many of my recipes, I didn’t have a version that had been passed down through my own family.
That’s when my mother-in-law stepped in and shared her family’s Clootie Dumpling recipe, which has been passed down through generations.
It did not disappoint.
Like so many of the best family recipes, it came with measurements that needed a little decoding – because you quickly learn that “one teacup” never weighs the same in grams twice, and certainly not from ingredient to ingredient!
Once I had that figured out, it soon became clear that this recipe made the mother of all Clootie Dumplings. It was HUGE.
My mother-in-law did mention that the men in the family used to enjoy the leftovers fried for breakfast the next day, so I suspect the size may well have been intentional! But for the average home baker cooking for family, I decided to halve the recipe, not least because the original was nearly impossible to fit into any of my pots.
The only other tweak I made was to the amount of mixed spice. After halving the recipe, I found myself craving a little more of those warming flavours, so I doubled the mixed spice.
Otherwise, this recipe remains the original family recipe, passed down through generations of one Scottish family – just a little smaller, but still a very generous dumpling.

Ingredients for Clootie Dumpling:
Self-raising Flour
Even though Clootie Dumpling is a dense pudding, self-raising flour gives it a little lift as it cooks. Rather than becoming light and fluffy, the dumpling simply grows slightly in size as it boils. The flour also helps bind the mixture together once the liquid is added.
Caster Sugar
Caster sugar provides a gentle sweetness without overpowering the other flavours. You could also use golden caster sugar or brown sugar if you prefer. Darker sugars will give your Clootie Dumpling a deeper colour and a slightly richer flavour.
Suet
Suet is what gives a traditional Clootie Dumpling its distinctive heavy, stodgy texture. Historically, beef suet was used, but these days, vegetable suet is much more common, as in my Jam Roly Poly recipe. I personally prefer vegetable suet, but either works perfectly well.
Breadcrumbs
Fresh breadcrumbs help give Clootie Dumpling its classic texture. Some recipes use oats instead, but I find breadcrumbs keep the texture softer and allow the fruit and spices to take centre stage. One slice of fresh white bread blitzed in a food processor is usually the perfect amount.
Mixed Spice and Cinnamon
Mixed spice and cinnamon bring the warming flavour you expect from a traditional Scottish fruit pudding. My mother-in-law’s original recipe used slightly less spice, but after testing, I increased the amounts a little for a fuller flavour.
Raisins & Currants
Raisins and currants are the traditional dried fruits used in Clootie Dumpling. Currants are especially good as their small size spreads evenly throughout the mixture. As with other Scottish fruit bakes like Christmas Cake or Black Bun, you can swap in other dried fruits if you prefer.
Apple
Grated apple adds extra moisture, flavour and texture to the dumpling. Any eating apple will work well here, and a small apple is usually plenty.
Treacle
Treacle adds richness, colour and depth of flavour to a traditional Clootie Dumpling. It also helps bind the mixture together, giving the dumpling its characteristic sticky texture and deep, dark colour. If you can’t easily get treacle where you live, like in my Treacle Scones recipe, molasses is a great substitute, as the flavour and consistency are very similar.
Milk
Milk turns the dry ingredients into a thick, sticky mixture ready for its cloot. Use cold milk straight from the fridge – this helps keep the suet in small pieces until cooking begins. Whole milk is traditional, but most milks (including plant-based options like soya milk) work well.

Tips for the best Clootie Dumpling:
• Need a Cloot? When it comes to your “cloot” or cloth, the options are pretty much endless. I use a muslin square, purely because I wanted them to make these pretty Clootie Dumpling photos. But you can use any old [clean] muslin cloth, tea towel or piece of cotton fabric. I’ve even heard of people using old pillow cases!
• Your Biggest Pot: When it comes to your pot, you want depth over width, and a lid is a must. Whilst filling your pot with water, only fill it about half to two-thirds full. Once you add your dumpling, the water level will rise considerably. I usually keep a jug to hand and remove some of the water before adding my dumpling, then return the water to the pot once the dumpling is in. A hack I came up with after scalding myself with overflowing water during my first Clootie Dumpling attempt! Ouch.
• Use a Saucer: You place a small saucer in the pot of water to stop the dumpling from touching the bottom of the pot (the hottest area) and getting burnt. A saucer lifts it away, preventing this from happening. A saucer is the traditional method, but I actually tend to use the lid of a Pyrex casserole dish – it’s a little heavier and doesn’t rattle around quite as much.
• Scald the Cloot: “Scalding” your cloot (ie, dipping it in the pot of boiling water) and dusting it with flour is an essential step – this is what forms the skin on your clootie dumpling. Don’t skip this! I find sifting the flour onto my damp cloot to be the most effective method for even distribution, but as long as you have a decent coating of flour, you’ll be grand. And you can tip/gently shake any excess flour into your bin or sink.
• Tips for Tying: You can simply tie your cloot with a piece of string and be done with it, but I find there is a method of tying that makes your Clootie Dumpling experience far more enjoyable… You take your length of string (about half a metre) and fold it in half. You then take the looped end of the string and use this to tie around your cloot, feeding the string through the loop, before tying the ends around and securing with a small knot. Next, you tie the loose ends of the string and drape it out of the pot, securing it around your pot handles or lid – this helps stop your dumpling from dancing around the pot too much, as well as making the removal of the dumpling so much easier.
• It Does Rattle: The saucer at the bottom of your pot will dance around, usually making a lot of noise. Don’t worry! This is normal, but it doesn’t seem to be mentioned in most Clootie Dumpling recipes – no need to panic.
• Floating is Normal: Your dumpling may float whilst cooking. Again, this is normal, but it doesn’t seem to be mentioned in most Clootie Dumpling recipes. As long as there is enough water to cover your dumpling while fully immersed, it will be fine. You may need to top up with boiling water periodically as it evaporates. But don’t be concerned if it is floating – the movement, as well as the heat being kept in by the lid, will ensure the top (bottom?) of your dumpling is cooked, despite it seemingly trying to escape!
• Don’t Skin it: Take your time removing the cloot – you don’t want to rip the skin off because you’re worried about burning your fingers! Start by removing it from the bottom and sides. Then use a plate to flip your dumpling, before removing the cloot from the top. Then gently flip it back onto its bottom, on top of a baking tray, ready to finish in the oven.

Save this recipe!
Want to save this recipe for later? Pop your email below and come back to it when you’re ready to bake.
Clootie Dumpling
INGREDIENTS
- 250 g Self-raising Flour (plus extra for dusting)
- 75 g Caster Sugar (Superfine Sugar)
- 50 g Shredded Suet (vegetable or beef)
- 30 g Breadcrumbs (fresh)
- 1 tsp Mixed Spice (Pumpkin Spice)
- 1/2 tsp Ground Cinnamon
- 170 g Raisins
- 120 g Currants
- 1 small Apple (peeled & grated)
- 1/2 tbsp Treacle (Molasses)
- 280 ml Milk (cold)
EQUIPMENT
- Small Saucer (to sit at the bottom of your pot)
- Muslin Cloth (or similar)
- String or Twine (ensure it's food-safe)
INSTRUCTIONS
- Place your saucer at the bottom of your pot and fill about half too two-thirds full of water. Set to boil, whilst you prepare your clootie dumpling.
- In a large bowl, add all the dry ingredients and the grated apple. Mix well until combined. Add the treacle and milk. Mix well until combined, and you have a sticky mixture. Set aside whilst you prepare your cloot (cloth).
- Take your cloot and dip it in your now-boiling water. Carefully remove the cloot with tongs and set it down to cool a little. Once cool enough to handle (but still warm), squeeze out the excess water, before laying your cloot onto a flat work surface. Sift a little extra flour over the top. You don't need flour from edge-edge/corner-corner but make sure the majority of your cloot is coated. Gently shake off the excess flour.
- Turn your dumpling mixture into the middle of your flour coated cloot, using your hands to shape it into a rough round shape. Take the corners of your cloot and pull them together, gathering the edges in too, making sure there's no gaps. Be careful not to pull your dumpling in too tight – you want to leave a little space for your dumpling to swell as it cooks. Tie your cloot with your string (see Granny's Top Tips for advice on how to do this efficiently).
- Place your dumpling into your pre-boiled pot of water, ensuring the entire dumpling is covered in water (top up with more boiling water if not). Reduce the temperature to a simmer and place the lid on your pot. Allow to simmer for 3 – 3½ hours. Keep an eye on your pot and top up with boiling water whenever the water is creeping below your dumpling.
- After 3 – 3½ hours, remove your dumpling from the pot and pop it onto your tray to cool for a short while, before removing the cloot. Be careful of your fingers because it will still be hot! Cut the string around your cloot and remove. Gently peel back the cloot from the dumpling, being careful not to peel off the skin too. Once you have peeled the cloot from the top and sides of the dumpling, use a plate to flip the dumpling and remove the cloot from the bottom, before returning it back to the baking tray, right-side up.
- Pre-heat your oven to 180°c (160°c for fan-assisted oven, Gas Mark 4 or 350°F). Allow your dumpling to air-dry whilst your oven pre-heats and then place it into your oven for about 20-30 mins, until the skin darkens and looks dry & shiny.
- Remove from the oven and allow to cool a little before serving in wedges, with custard or cream.
IMPORTANT NOTE:
All my recipes are developed using a digital scale and the metric system (grams and millilitres). Cup measurements are available as a conversion but these, unfortunately, won’t always be as accurate. For best results, I always recommend baking with a digital scale.
NOTES
Storage:
Clootie Dumpling can be kept in an air-tight container in the fridge for up to one week. It can be eaten cold but is best enjoyed when warmed up before serving (either in the microwave or in the oven, wrapped in tin foil).Freezing:
Clootie Dumpling can be frozen for up to 6 months. For ease, cut it into wedges, wrap well in cling film and tinfoil, and freeze individually. Defrost before serving. Again, it is fine to eat cold, but best enjoyed when warmed up (either in the microwave or in the oven, wrapped in tin foil).Substitutions:
- Sugar: This recipe uses Caster Sugar, but you can swap this out for Golden Caster Sugar or brown sugar, should you prefer.
- Dried Fruit: Currants and raisins are traditionally what are used in a Clootie Dumpling, but you can use any combo of dried fruits that you have, or prefer. Just be sure to use the same total weight.
- Spices: Mixed Spice and Ground Cinnamon are what this recipe calls for, but you can adapt the spices to your personal taste, using more or less, adding some ginger or nutmeg – whatever you like! And if you are in the States, pumpkin spice is a close substitute for mixed spice.
- Treacle: While treacle is readily available in the UK, it isn’t always available worldwide. If you are somewhere that treacle is hard to obtain, molasses is a good, close alternative.
- Milk: Whole-fat, dairy milk is the most traditional option for Clootie Dumpling, but other milks work just as well, including dairy alternatives like soya milk.
Tried this recipe?
Tag @bakingwithgranny or use the hashtag #bakingwithgranny!Clootie Dumpling is a traditional Scottish pudding, comparable to Christmas Pudding but unique in its own way. The dumpling itself is made up mostly of dried fruits, such as raisins & currants, along with flour, breadcrumbs, sugar, suet, and milk, and a few other flavourful ingredients.
What makes Clootie Dumpling unique is the way it is cooked, which also gives it its name. Clootie Dumpling is boiled in a cloth, which in Scotland is also known as a “cloot”. The method also helps achieve the unique texture that Clootie Dumpling is known for and loved.
To make an authentic Clootie Dumpling, you start by mixing your dried ingredients, then add your wet ingredients and mix until you have a thick, sticky dumpling mix.
You then take your “cloot” (cloth), scald it in hot water, before squeezing out the excess water & dusting it with flour. It’s this vital step that gives your Clootie Dumpling its skin. Next, you spoon your dumpling mixture into the cloth, tie up the corners and edges, and then boil your Clootie Dumpling for around 3 hours.
Once the boiling time is done, you take your dumpling out of the water, carefully remove the cloot, before popping your dumpling into the oven to dry out the skin. Historically, you would dry it out beside the fire, but I find an oven a bit more agreeable for modern life!
Finally, you can serve your Clootie Dumpling warm, with some custard, fresh cream, or a scoop of ice cream. Or, fry it in slices the next day and have it for breakfast.
The name comes from the cloth used to cook it. In the old Scots language, a “cloot” simply means cloth.
The dumpling mixture is wrapped in a floured cloth before boiling, which helps it hold its shape as it cooks and gives the finished dumpling its characteristic outer skin.
Not at all, but it can feel intimidating if you’ve never made one before.
The ingredients themselves are simple, and the mixture comes together easily. The main thing that feels unusual is boiling the dumpling in a cloth rather than baking it in an oven. That’s why this recipe includes detailed step-by-step instructions and tips to help guide you through the process.
Clootie Dumpling keeps very well due to its high dried-fruit content. Keep any leftovers in an airtight container in the fridge, where they will be good for a week. Any longer, cut your dumpling into wedges and freeze them individually – it will be good in the freezer for up to 6 months.
Clootie Dumpling can be eaten cold but is best enjoyed whilst warmed up again (in the microwave, or wrapped in foil in the oven).
Traditionally, a cloth is essential for making a proper Clootie Dumpling, as it helps hold the mixture together while it cooks. However, if you don’t have a suitable cloth, some people cook the mixture in a pudding basin or heatproof bowl instead. This changes the texture slightly and won’t create the classic outer skin, but the flavour will still be very similar.
Yes! And this is a very traditional way to enjoy leftovers. Simply slice the dumpling and fry it in a little butter until warmed through and lightly caramelised. Many families enjoy fried Clootie Dumpling for breakfast the next day, served with bacon.
Free-from & Vegan:
Gluten-free: I haven’t tried making a gluten-free Clootie Dumpling, but in theory, it should be as easy as using gluten-free self-raising flour, gluten-free suet and gluten-free breadcrumbs. If you do try this recipe for gluten-free Clootie Dumpling, let me know how you get on!
Nut-free: This Clootie Dumpling recipe doesn’t contain any nuts, but be sure to double-check your individual ingredients for allergens.
Egg-free: This is an egg-free Clootie Dumpling recipe. But be sure to double-check your individual ingredients for allergens when making for someone with an egg allergy.
Dairy-free: To make this a dairy-free Clootie Dumpling recipe, simply use your favourite milk alternative. I have used soya milk with great success, but I think any plant milk should work.
Vegan: To make this a vegan Clootie Dumpling recipe, simply use a vegetable suet and your favourite milk alternative. I have used soya milk with great success, but I think any plant milk should work.
N.B. Any advice or suggestions to make recipes “free-from” or vegan are purely that – suggestions. Please be careful to double-check all ingredients individually, taking extra caution when serving to those with allergies & intolerances.
For more info on common food allergies, please see food.gov.uk | For more info on coeliac disease, please see coeliac.org.uk | For more info on a vegan diet, please see vegansociety.com


I’ve made this recipe twice and each result came out amazing.
My last one, I ran out of treacle so I substituted the remainder with golden syrup and it worked great.
Might not have had the same dark colour but the entire family loved it.
How long would you need to. Cook the dumpling if the quantity was doubled?
How can you tell when it is cooked?
We never put in oven to dry just dry naturally ordinary sugar was used and a tight fitting lid keep the duff we called it covered in boiling water can take up to 4 hours depending on amount delicious cold as well for breakfast with fried egg just reheat in microwave for less than a minute .
My wife’s granny used to add a grated CARROT to the recipe…yes, you read that right carrot! Trust me, you will not be disappointed!
I made one with my sister-in-law on Hogmanay (it’s starting to turn into a tradition now!) and it was a beast of a thing. Turned out great and everyone was raving that it was our best one-yet! I wish I could upload the photos. I have fond memories of helping my late mother make them as a child.
That a great tip from Caroline on turning the plate in the saucepan upside down to stop it rattling-thanks!
Has anyone tried using a pressure cooker to make this pudding. . ? And I expect it still has to be in ‘cootie’ tied leaving ,a bit of expansion space.?
Pressure cooking ,using lot less water and time ?
I hope it’s possible.
Yes, that’s how I do it. I’ve usually made turn around half this size (using Felicity Cloake’s recipe) – it’s still pretty big! and cook it in the pressure cooker for about 45 minutes. The pudding (in the cloth) is on a trivet, water up to about half-height of the pudding.