INGREDIENTS
- 200 ml Milk
- 115 g Block Margarine or Butter
- 300 g Strong White Flour (Bread Flour)
- 250 g Plain Flour (All-purpose Flour)
- 140 g Caster Sugar (Superfine Sugar)
- 7 g Easy Bake Instant Yeast (Fast-action Yeast) (usually 1 sachet)
- 2 Free-range Eggs (beaten)
- 200 g Icing Sugar (Powdered Sugar)
- Food Colouring (optional)
INSTRUCTIONS
- In a small pan, warm the milk & butter/margarine until it's lukewarm (not hot!) and the butter/margarine is melting.
- Meanwhile, sift the flours into a large bowl. Gently mix the sugar and yeast through to combine. Add the milk mixture and stir in a little, before adding the eggs too. Mix until you have a soft, slightly sticky dough.
- Transfer the dough to well-floured surface, and using well-floured hands, knead the dough for around 10 minutes.
- Place the dough into a oiled bowl (to prevent it from sticking) and cover with an oiled piece of cling film, or a damp tea towel. Leave to rise in a draught-free location for 1-2 hours, or until it has doubled in size.
- Lightly grease a large baking/roasting tin (I use a 35cm x 24cm one) and dust it with a little flour. Set aside.
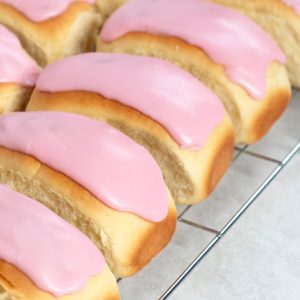
- After your dough has doubled in size, turn it out onto a lightly floured surface and knock it back. Divide your dough into 12 even-sized balls, before rolling each between your hands to create a sausage shape. Place the sausage-shaped buns into your prepared tin, in two rows of 6, with a little space between each (they need room to grow!). Cover loosely with lightly greased cling film or a damp tea towel.
- Leave to rise in a warm place for 1-2 hours until they look light and puffy.
- Once the buns have completed their second rise, bake them in a pre-heated oven at 180°c (160° for a fan-assisted oven, Gas Mark 4 or 350°F) for 15-20 minutes until golden in colour and have a hollow-like sound when gently tapped on top.
- Allow the buns to cool in their tin before icing. To ice the buns, mix 200g of icing sugar with a little cool water (start with a teaspoon of water and gradually add more as needed - it's easy to add more water but not easy to correct too much). Add a little pink food colouring if you wish. You want a thick gloopy texture if you intend to spread the icing, or a slightly thinner consistency if you intend to pour the icing or dip the buns.
IMPORTANT NOTE:
All my recipes are developed using a digital scale and the metric system (grams and millilitres). Cup measurements are available as a conversion but these, unfortunately, won't always be as accurate. For best results, I always recommend baking with a digital scale.
NOTES
For full ingredient explanations and substitutions, please see the Ingredients information above.
See more tips for success in Granny's Top Tips above.
Tried this recipe?
Tag @bakingwithgranny or use the hashtag #bakingwithgranny!